Using the Garmin Etrex Vista HCx
 Unfortunately we found that the manual that came with the Garmin Etrex Vista HCx was a bit limited. Basically it tells you where all the buttons and menus are but sadly really doesn't tell you how to use GPS unit in the field so to speak. We don't profess to be GPS experts but you might find the following information useful and it may help you to avoid the pitfalls that we found when we first used it on tour.
Getting Started
Before you leave home download all your tracks onto your computer and then check to make sure that they are indeed copied before continuing.
Resetting the Trip Computer
The Garmin Etrex Vista HCx has a trip computer which will record the accumulative trip information for your tour. It will record such information as total distance, maximum speed etc. before you set off on the first day of your tour you will need to is to reset the trip computer.
|
|
|
|
You will be asked to confirm that you wish to reset those selected.
Saving tracks onto the micro SD card
One useful aspect of the Etrex Vista HCx is the support for micro SD cards. The Vista HCx will save 1000 waypoints but only 20 tracks. I prefer to save a track for each day therefore if you are out for more than 20 days you will need to make sure the Garmin saves a copy of the tracks to the micro SD card. Once this is enabled a new file is recorded for each day you use the etrex until the card is filled.
|
|
|
|
Recording to the 'Track log'.
Turning on the track log
Before starting out on your day you need to turn on the 'Track Log' to record your journey.
|
|
|
4. Once you have cleared the track log you can turn on the 'Track log' as per stage 2 above. You can now press the 'Quit' button to return to the main map screen. As you move along you should see your track as a green line on the map screen. |
Turning off track recording and saving the track log
At the finish of your journey you will need to turn off the 'Track log'.
|
|
|
|
Other GPS tips
To save battery power if you stop for any length of time just turn off the GPS but remember to switch it back on before you start off again!
Useful Garmin Etrex Vista HCx GPS links
- freegeographytools.com
- gpsfaqs.org - Good set of FAQ's for the Etrex Vista and other GPS units.
- Tips & tricks for using the Garmin Etrex Vista HCx hand held gps receiver.


 The Celtic Cycling Circle
 Cycling alongside the Grand Union Canal
 5 Essential Items to Take with You on Your First Cycling Tour
 Favorite Cycling Destinations: Sardinia
 Pamir to Karakoram- cycling the highways on the roof of the world
 4 Wheels 2 Hearts 1 World - A Day in Our lives
 Koga E-Worldtraveller - e-bike review
 Ten tips for tandem cycle touring
 colmandsamstreks - Two Beginners in France
 1. A quick way to reset everything this is to go to the main menu and select 'Trip-Comp'.
  2. You should get the Trip computer screen which shows the data from your last trip.
 3. To reset the trip you will need to press the 'menu' button and you will get a further menu. Use the joggle stick to move down to select select 'Reset..." and press enter.
 4. This brings you to a screen where you can either select to reset all or only select a few to reset. If you want to keep your waypoints and routes don't select all but use the joggle switch to move down the list and select the ones you wish to reset and then click 'Apply'.
  1. To do this go to the main menu and use the joggle switch to select 'Tracks'.
  2. In the 'Track Log' screen use the joggle switch to select 'Setup' and click 'Enter'.
 3. Use the joggle switch to scroll down to highlight 'Data Card Setup' at the bottom of this screen and press 'Enter'.
 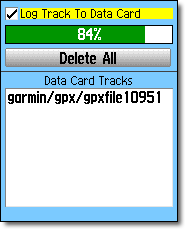 4. Put a tick next to where it says 'Log track to Data Card' by highlighting it and pressing 'Enter'. Then press the 'Quit' button to exit out of all the screens to get back to the main menu screen.
 3. First check that you have saved the current track, it should be listed in the list of saved tracks (if it isn't saved then see saving a track below). To clear the current track use the joggle stick to move down to select 'Clear' and press 'Enter', a dialogue will appear asking if you really wish to clear the track log, select 'Yes'.
 1. Go the main menu and select tracks. Use the joggle stick to move across to select 'Off'. Now you will need to save your days track. Use the joggle stick to move down to select 'Save' and press the joggle stick to 'Enter', again it will ask you if you want to save the entire track, you do so now click 'Yes'.
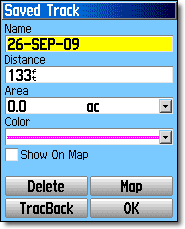 2. You will now get the 'Saved Track' screen. You can accept the default name which is the current date or you can input your own name.
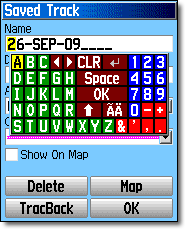 3. To input your own name for the track use the joggle stick to move up to select 'Name' and press the joggle stick to 'Enter'. You will then get the on screen keyboard which you can use to input your own name. When you have inputted the name use the joggle stick to move down to select 'OK' and press the joggle stick to save the track.